Need to load a bunch of tasks into Microsoft Planner without clicking through the UI one by one? Using Power Automate and Excel (or any other available data source 😉), you can bulk import tasks into Planner in a single flow run. I have previously recorded a video on this process and use both a tasks table and a config table to support this cloud flow. This will enable you to dynamically choose the group and plan name, as well as import planner tasks involving a title, bucket id / name, start and due date, assigned user ids, a category, priority, check list and file attachment(s)! This flow is not for the faint hearted but should support you with your goal to build a Planner Power Automate integration.

Sample Excel Tables
A sample flow and template file is available to download from my github in the video description and at the bottom of this article, but I would strongly encourage you to watch the video to see how I created this solution.
As some of the expressions are complex, I have made them available via this post to suppliment the original video.
The Trigger and Initial Setup
The flow is currently manually triggered, you could of course create an excel file and run on a recurrence trigger or use when a file is created and simply upload a template file to a watched document library. Based on the requirement to import my solution (legacy) there are some short notes to follow and you will need to update the first two list rows actions which retrieve the tasks and config table from Excel.
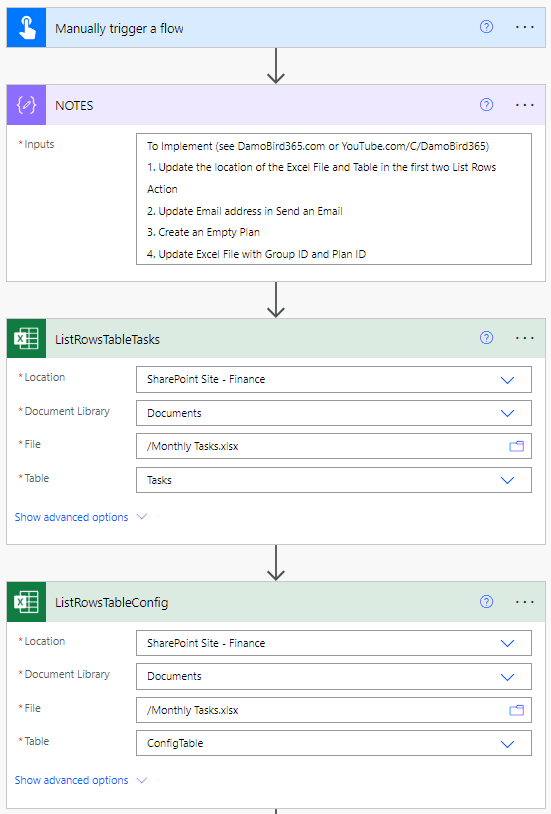
Getting the Group ID
In order to run this solution dynamically, we need to retrieve the group id of the plan. You will tend to see that I use scopes to bring actions with a particular purpose together. We list the teams that we have access to, filter that teams list where the team name is equal to the name from our config table and then output the group id into a compose.
The expressions used here are:
outputs('ListRowsTableConfig')?['body/value']?[0]?['GroupName']

body('Filter_array_Teams')?[0]?['id']
Note that we have used the integer value [0] to retrieve the first object from the array, otherwise we would find ourselves in an apply to each loop. The alternative is to use first().
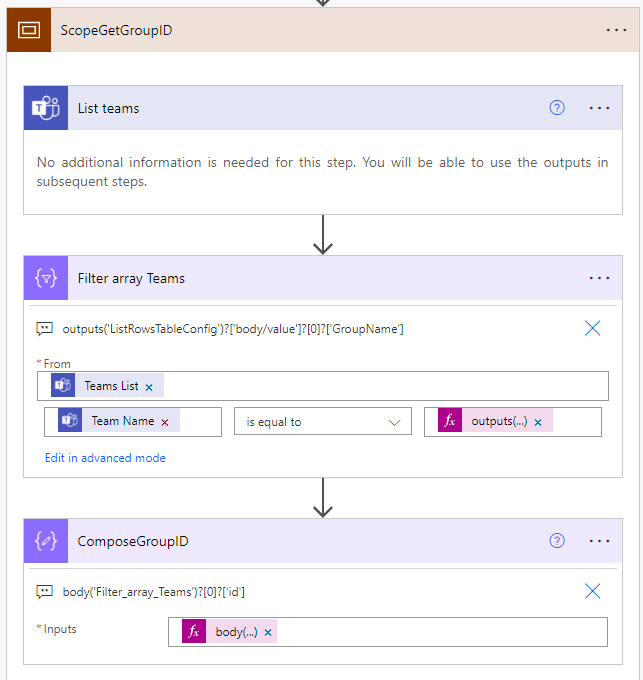
Listing Plans and Buckets
Below we list all of the plans for an existing group and then filter those plans based on the plan name from the excel config table. Finally we list all buckets that exist on that plan.
The expressions used here are:
outputs('ListRowsTableConfig')?['body/value']?[0]?['PlanName']

body('Filter_array_Plan_ID')?[0]?['Id']
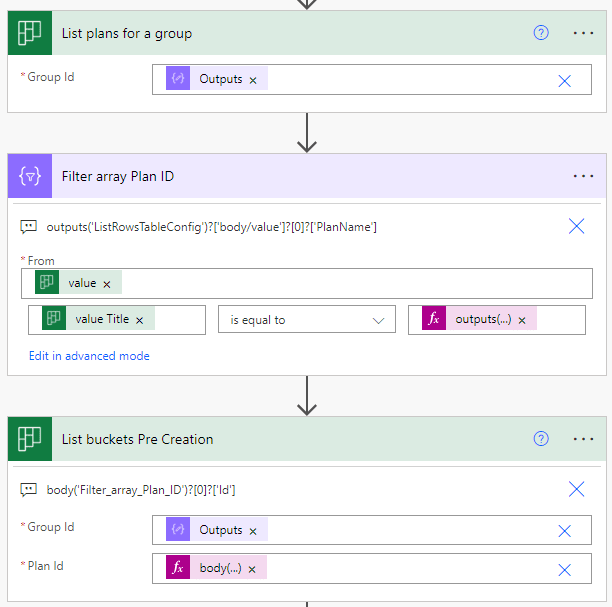
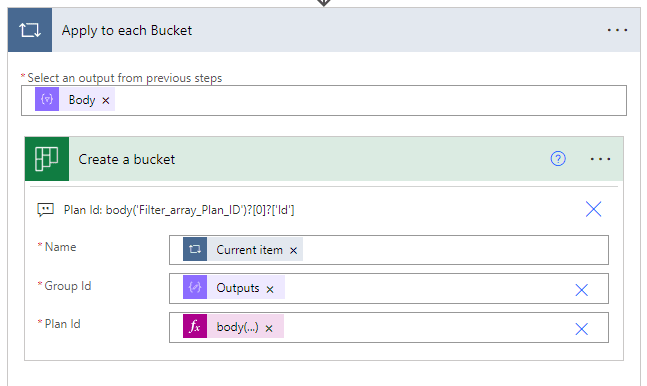
Create Buckets that are missing
Next we must create bukets that are missing from the action above. For example, we have a plan with 3 buckets but our excel table has 4 buckets, maybe we have introduced a new quarter (Q4) or project stage to our table but not yet configured it on our plan. The next few actions will identify the missing buckets and create them for us.
The first select (in text mode) allows us to create an array of bucket id’s (note that we use the name and not the guid) used in our excel sheet (as seen above) and then using a union, we can get the distinct bucket id’s (i.e. names). We can then use another select to get the bucket names from the list buckets pre creation action and then filter from the unique buckets (distinct buckets on excel), where the buckets from the planner does not contain the name of the bucket from distinct buckets. The expression used here is item(), to refer to each bucket id / name.
Then, for each bucket identified by the filter, we loop and create those buckets. The input to the apply to each is the output from the filter array, the name is based on current item, group id based on the compose of the group id and plan id based on the plan id from the filter.
Expressions used here are:
body('Filter_array_Plan_ID')?[0]?['Id']
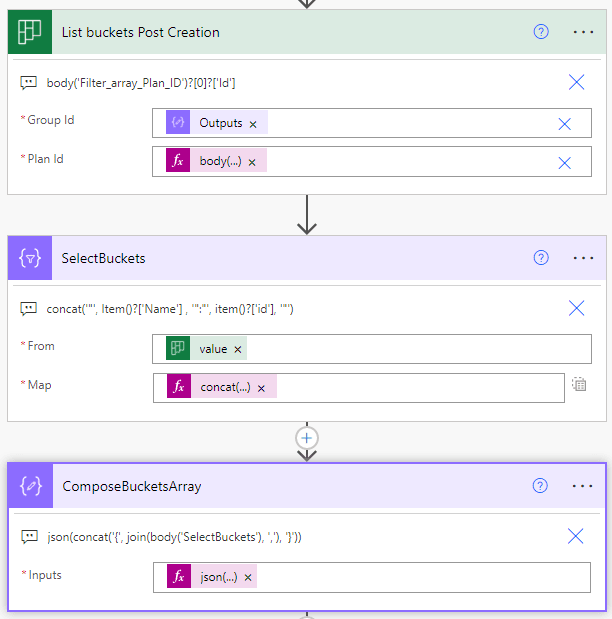
List buckets post creation and create an Object {} of Buckets
We then list the buckets again post creation in order to get the internal bucket id’s as used to create the tasks in the final stages of our flow. These actions rely on the unique internal guid and not the friendly name you might call your bucket. As the buckets are returned as an array, we have repurposed this data to create an object. The advantage of an object is that you can call the guids by the friendly name. I have seen other solutions require that you store the guid in the table, this is not the case here. If you want to understand more about objects, watch this video.
The select, in text mode, allows us to create an array of strings based on a key/value pair -
"Bucket Name" : "Bucket Guid"
We can then use this array of strings to our advantage, join them on a comma, add a { and } to the start and end and then parse as JSON. All of which you can watch in my video above. The alternative is to filter for each bucket guid as you create your tasks or store that guid in your sheet. I think this method is easier once setup and will create something similar to:
{
"Bucket Name1" : "Bucket Guid1",
"Bucket Name2" : "Bucket Guid2"
}
Expressions used here are:
concat ('"', Item()?['Name'] , '":"', item()?['id'], '"')
json (concat ('{', join(body('SelectBuckets'), ','), '}'))
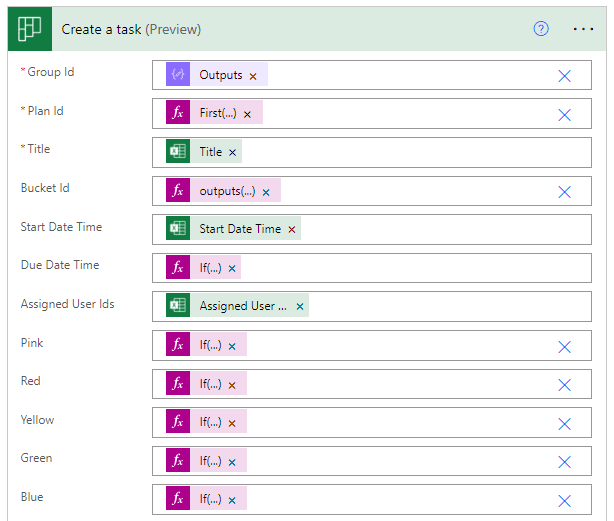
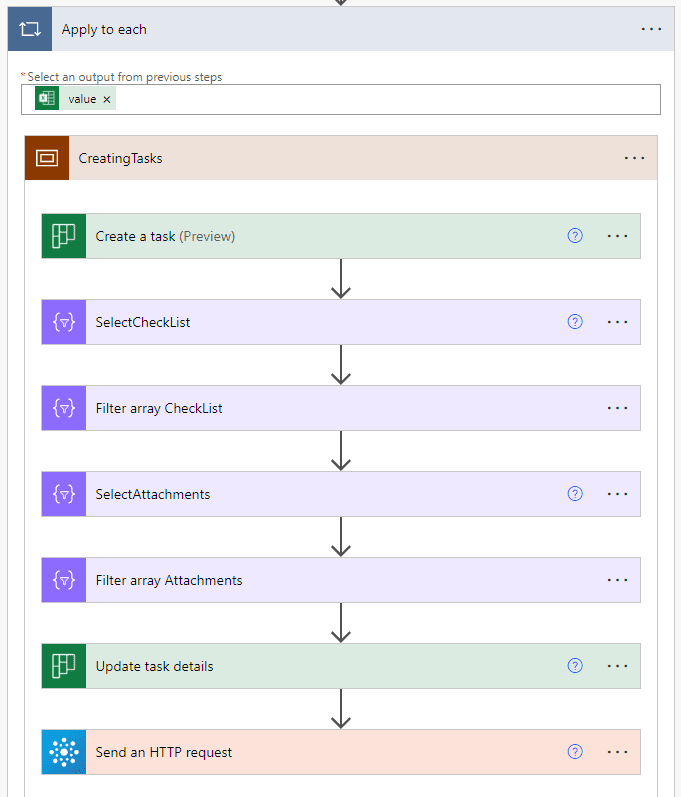
Create tasks on our Plan
For each row in our excel table, we want to create a new task in our planner. For this we have a scope, with 7 actions! The first action, will create a simple task, with the bucket id, start and due date, assigned user ids, category and don’t forget your priority (not in screenshot but hidden away at the bottom of the action parameters).
Expressions used here are:
Plan ID: First(body('Filter_array_Plan_ID'))?['id']

Bucket ID: outputs('ComposeBucketsArray')?[items('Apply_to_each')?['Bucket Id']]

Due Date: If(empty(items('Apply_to_each')?['Due Date Time']),formatDateTime(Adddays(items('Apply_to_each')?['Start Date Time'],7),'yyyy-MM-dd'),items('Apply_to_each')?['Due Date Time'])

Pink, Red, Yellow etc: If(equals(items('Apply_to_each')?['Category'],'Pink'),true,false)
Creating a Check List
Next we must create an array for our check list and each item in the list must have a unique ID, a title (based on our excel table column) and an ischecked value, for which we have set to false, i.e. not checked. For that we use a select and a filter (to remove any objects with a blank title).
Expressions used here are:
From: range(0,length(split(items('Apply_to_each')?['Check List'],',')))
id: item()
title: split(items('Apply_to_each')?['Check List'],',')?[item()]
To explain in a bit more detail, the range creates an array of numbers from 0 based on the length of an array. In the excel table there is a task list that is comma seperated. Split will create an array of tasks and length will count those values. This is our unique ID.
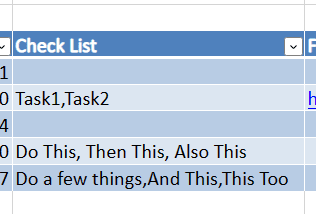
sample check list
In the Map, we have id, which is item() and that refers to the unique ID from the range i.e. [0,1,2]. The title is based on the integer index of an array, based on the split of the comma seperated list. Therefore if you have 3 check list items, an array [item1,item2,item3] is created. To select item2, we use index [1], item3 is index [2]. Indexes start from [0], i.e. first(). Range allows us to create both a unique ID and select list items by integer.
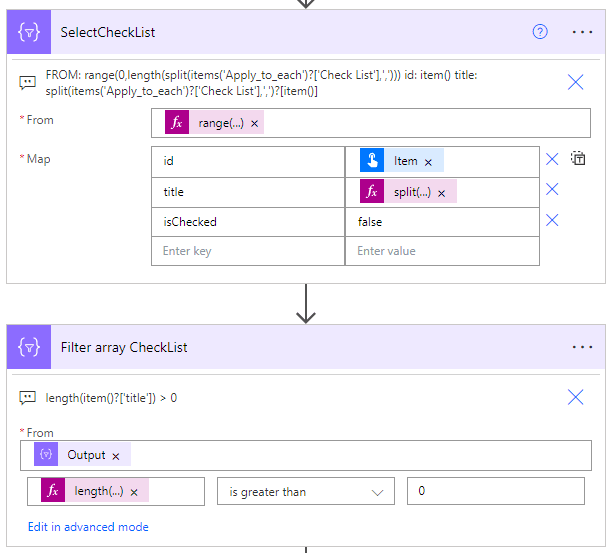
The filter array simply removes any values from the array where the title length is null length.
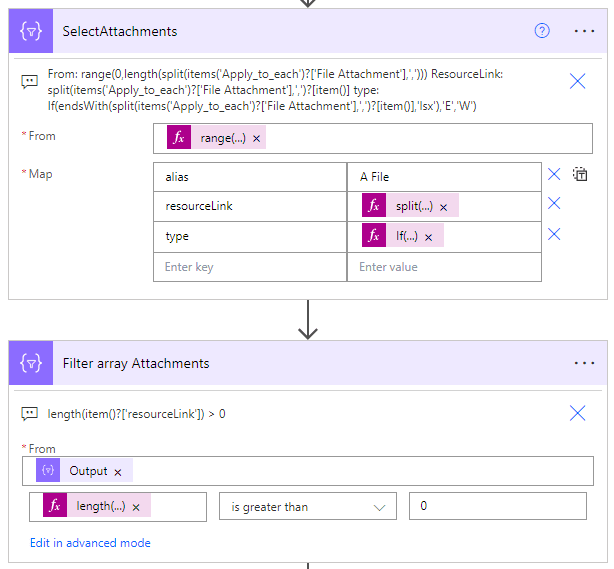
Creating an attachments array
The attachments array is based on SharePoint links to a file(s), comma seperated. As before we use a select and a filter array to remove any objects where the resourcelink is blank. The alias is fixed, resource link is a link to said file and is accessed based on integer index (same as above) and type is based on word or excel and a check is done on the file extension.
Expressions used here are:
From: range(0,length(split(items('Apply_to_each')?['File Attachment'],','))) ResourceLink: split(items('Apply_to_each')?['File Attachment'],',')?[item()] type: If(endsWith(split(items('Apply_to_each')?['File Attachment'],',')?[item()],'lsx'),'E','W')
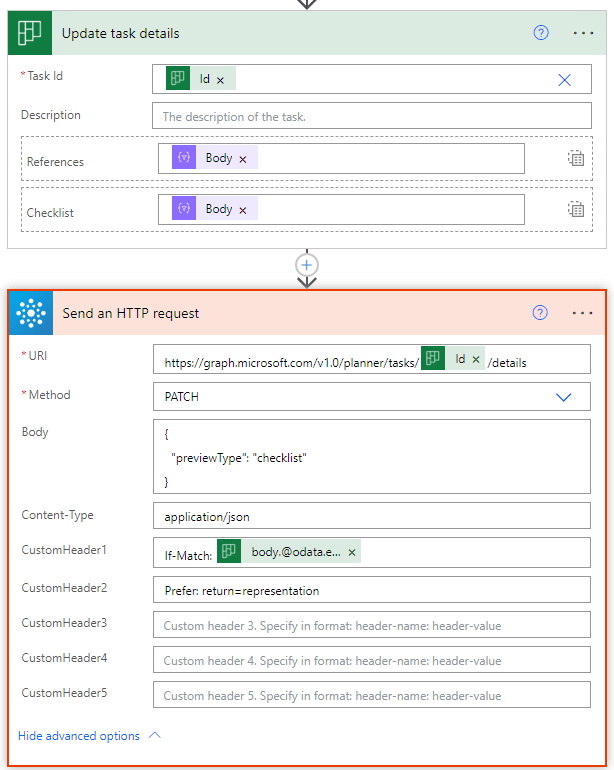
Update the Task with attachments, check list and make the check list visible
Lastly we can add the references i.e. the links and the check list from both of the respective filter array action outputs. This is achieved with the update task details action. If you also want the check list items to be visible, you can enable this with a call to the Graph API based on the following expressions:
URI: https://graph.microsoft.com/v1.0/planner/tasks/@{outputs('Update_task_details')?['body/id']}/details

Body: { "previewType": "checklist" }

Content-Type: application/json

CustomHeader1: If-Match: @{outputs('Update_task_details')?['body']?['@odata.etag']}

CustomHeader2: Prefer: return=representation
The complete apply to each excel row to create and update a task looks like follows:
The sample excel template and template flow (legacy) can be downloaded from GitHub. Please let me know how you have developed your own solution in the comments below or via Social Media via DamoBird365.