Want to keep your organisation informed about Microsoft 365 service health without constantly checking the admin centre? In this post, I’ll show you how I used Power Automate with an Azure App Registration and the Graph API to pull service health and message centre data into a SharePoint List, Teams alerts, and more.
We’ll start by creating an Azure app registration and using the Graph API to bring data into Power Automate. From there, you can save this information to a SharePoint List, publish it to your organisation, build a Power App, or set alerts for degraded service health via Teams or email.
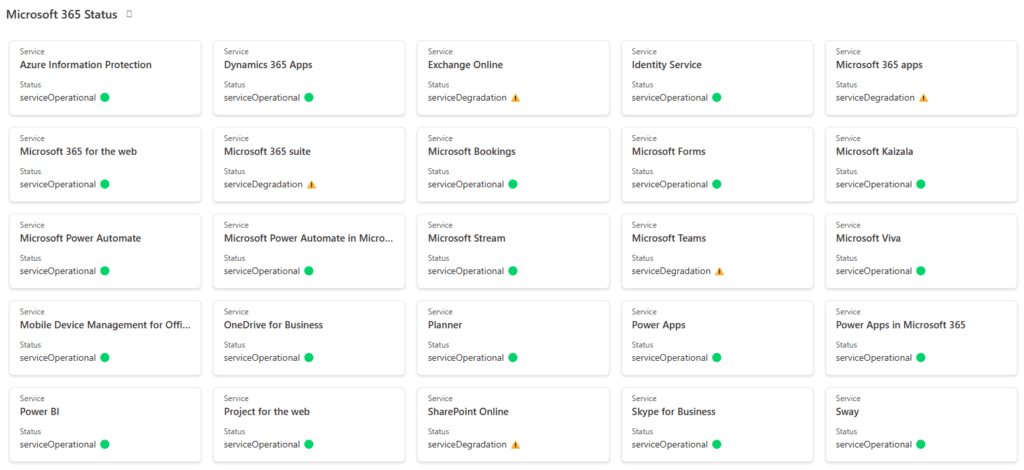
SharePoint List, Gallery View of Service Status via HealthOverview
Azure App Registration
In order to grant access to the Graph API, you will need either a delegated or application app registration. I have chosen an App registration to avoid having to tie this to a specific user account.
Below is a step by step guide which should enable you to setup the app registration, generate and gather a client secret value, obtain the client id, oauth endpoint and of course grant the necessary permissions to allow access to the Service Health and Communications Graph API.
- Open the Azure portal https://portal.azure.com and sign in with your Azure account.
- Select “App registrations” and click on “New registration”.
- Give your app a name and select the appropriate account type (e.g. single tenant or multi-tenant).
- Click on “Register”.
- Once the app is registered, open the “Certificates & secrets” section.
- Click on “New client secret” and enter a description.
- Select the expiration period and click “Add”.
- Copy the newly created client secret value and save it in a secure location.
- Open the “API permissions” section and click on “Add a permission”.
- Select “Microsoft Graph” and choose the desired permissions (e.g. ServiceHealth.Read.All & ServiceMessage.Read.All - Application Permissions).
- Click on “Add permissions”.
- Click on the “Grant admin consent” button to grant the app the necessary permissions.
- Now your app is registered in Azure and ready to be used with the Microsoft Graph API.
- Open the “Overview” section and copy the “Application (client ID)”
- Click on Endpoints and copy the “OAuth 2.0 token endpoint (v2)” endpoint
Testing & creating Graph queries using Graph Explorer
Via the Graph Explorer it is very easy to build and test rest api calls to the Graph API. For dervice message we can use https://graph.microsoft.com/v1.0/admin/serviceAnnouncement/messages to pull back all of the familiar data from the Microsoft 365 Admin Message Center (details here) and then there is https://graph.microsoft.com/v1.0/admin/serviceAnnouncement/healthOverviews to pull back data on general Platform health, as well as obtaining specific details about the platform of your choice, including updates and links as seen in the Microsoft 365 Admin Service Heatlh (details here). Note you have plenty of other options to suite your requirements, including archiving and marking messages as read.
When these endpoints are combined with Odata filters, a select or orderby parameter, we can really tailor the data received back from the Rest API. More details of where can be read up on here.
For the example in this post I am going to filter the service announcement messages for the following services Microsoft 365, Planner, Microsoft Power Automate, Power BI, Power Apps, Microsoft Forms; ensure that we only retrieve messages from 1st January 2023 onwards and order these messages by the start date time. Also given the data returned is quite expanse, I am use select to retrieve specific fields, mainly id, category, severity, tags, title, category, startdatetime, enddatetime, services, details, body. This allows me to limit and be selective about the data returned back to Power Automate.
A sample Graph API query for this data would be as follows:
https://graph.microsoft.com/v1.0/admin/serviceAnnouncement/messages?$select=id,category,severity,tags,title,category,startdatetime,enddatetime,services,details,body&$filter=startDateTime ge 2023-01-01 and services/any(p:p in ('Microsoft 365', 'Planner', 'Microsoft Power Automate', 'Power BI', 'Power Apps', 'Microsoft Forms'))&$orderby=startDateTime+desc
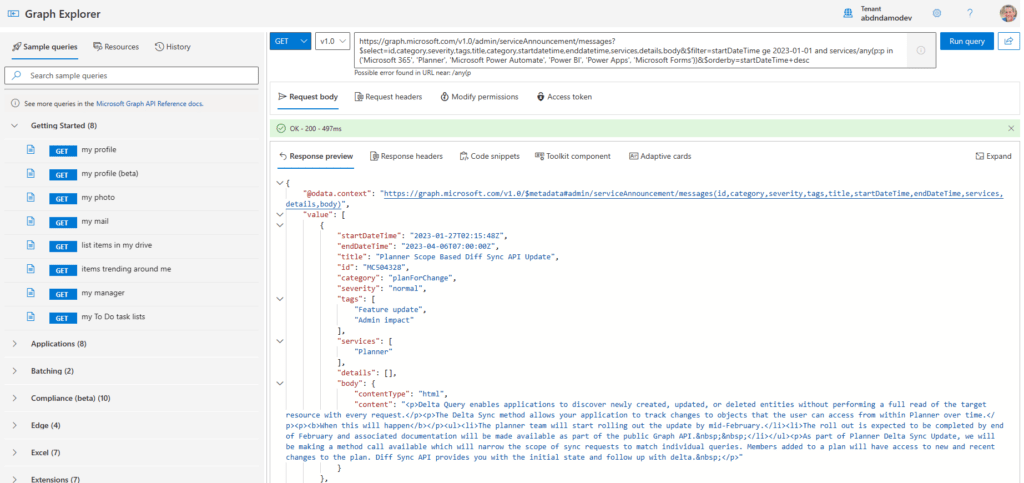
Graph Explorer
Setting up Power Automate for Authentication
In order to authenticate with our Azure App registration via Power Automate, we can use the HTTP action or build a custom connector. For the example today, I have used the HTTP action to obtain a bearer token and then a subsequent one to query the Graph API endpoint, the bearer token is valid for 60 minutes and so it can be used as many times as you wish during your flow run, assuming it finishes in under 60 minutes.
Setup of the HTTP Post to obtain a token is farily straightforward, albeit I always have to reach for google to remind myself how to do it. About time I wrote a blog post to remind myself. The Method is of course POST, the URI is based on the Endpoint copied from your App registration (Step 15 above) and will include the GUID for your tenant. Using the client id and client secret in your body, you should be able to get a response back and then use the access token value from the body in the next step.
//Header
{
  "Content-Type": "application/x-www-form-urlencoded"
}

//Body
client_id=['client_id']&client_secret=['client_secret']&grant_type=client_credentials&scope=https://graph.microsoft.com/.default
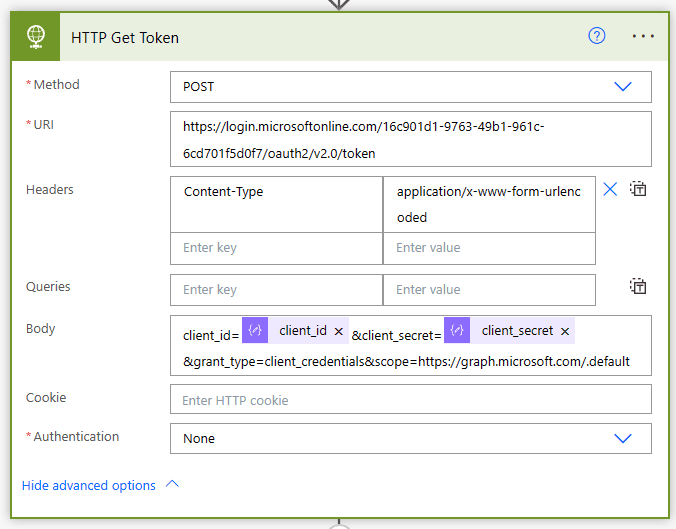
HTTP action to obtain a bearer token from Azure App Registration
Get Service Announcements via HTTP
In order to retrieve the service announcements, we can construct an HTTP action to https://graph.microsoft.com/v1.0/admin/serviceAnnouncement/messages and pass the Odata parameters as defined and tested earlier in Graph Explorer. It is worth noting that you cannot pass these parameters directly in the URI. They must be included in the Queries parameters as seen below.
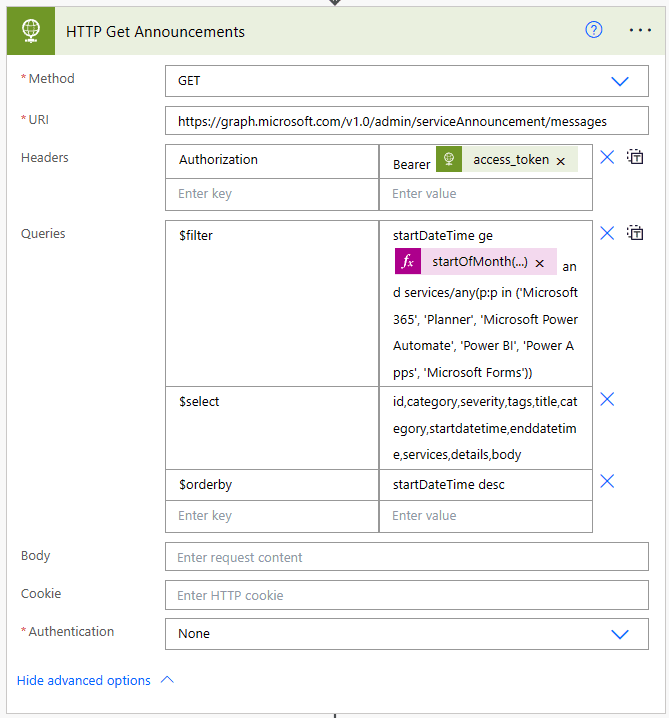
HTTP Action to obtain the Service Announcements
{
  "$filter": "startDateTime ge @{startOfMonth(utcnow(),'yyyy-MM-dd')} and services/any(p:p in ('Microsoft 365', 'Planner', 'Microsoft Power Automate', 'Power BI', 'Power Apps', 'Microsoft Forms'))",
  "$select": "id,category,severity,tags,title,category,startdatetime,enddatetime,services,details,body",
  "$orderby": "startDateTime desc"
}
If you’ve watched my YouTube, you will knowthat I love my expressions. If you’re wondering how to get the Access Token, the expression is body(‘HTTP_Get_Token’)?[‘access_token’] where HTTP_Get_Token is the name of the HTTP action. You must prefix this with the word bearer and a space, Bearer AccessToken. If after setting this up, you are getting strange errors but are getting a bearer token in your first HTTP action, an incredibly useful site for decoding these tokens is here and it will determine the permissions that have been granted by the authentication. Worth checking you have been granted the Graph Application Permissions via the Azure App Registration.
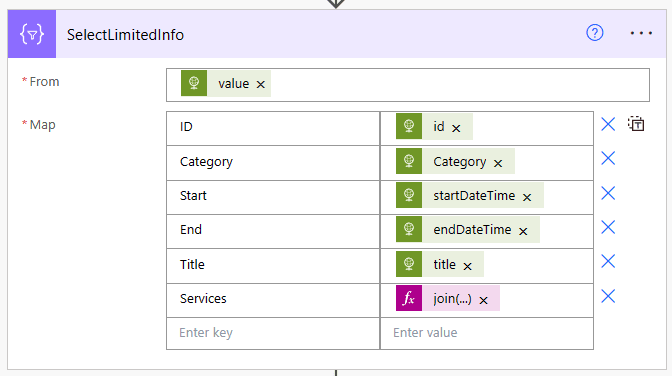
Repurposing the data
Using a Select Action we can repurpose the data from the value array returned by the HTTP Action. I have typed these expressions manually based on item()?[’nameofkey’]. Note that for the services value, an array is returned by default. I have therefore created a string from the array by using join(). The expression would therefore be join(item()?[‘services’],’, ‘).
Repurpose data from HTTP Action
With the data repurposed, it can be passed to the Create HTML Table as input and of course, you probably know the rest at this point. Many uses with the data in an array, send a teams message, build a dynamic adaptive card, add items to a list or dataverse or use the data directly in a Power App.
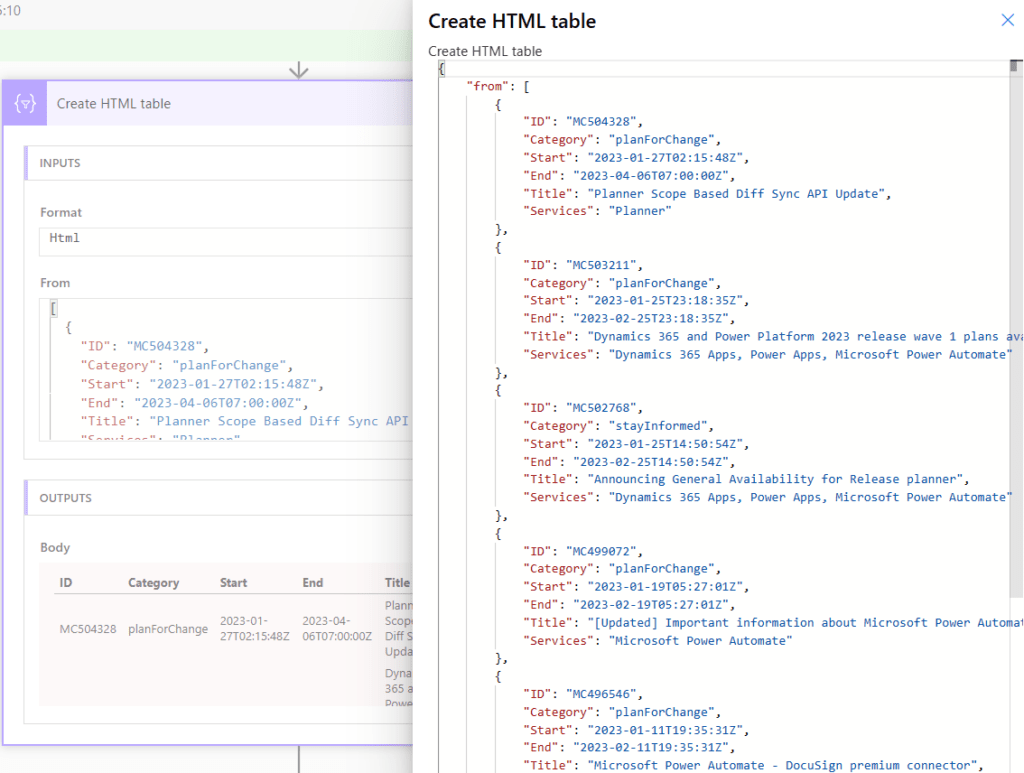
HTML Table of Service Announcements
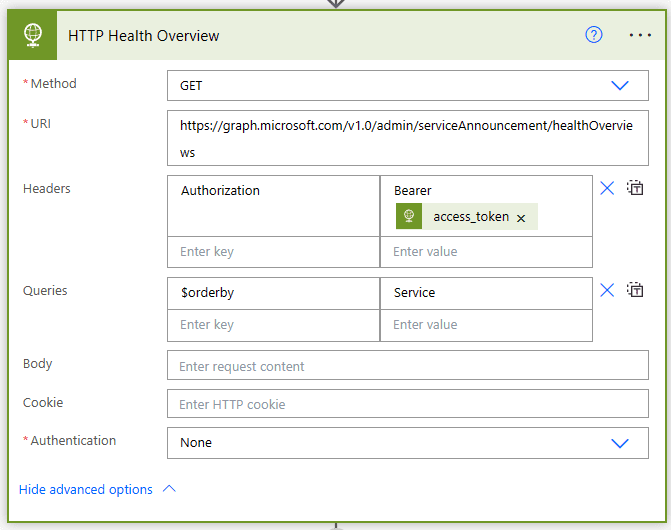
Get Health Overview via HTTP
Very much like the action above, you can also query the HealthOverview endpoint and get a very compact array of service name and status. If you liked the opening images on this post, I used this data to update a SharePoint list and display it in Gallery Mode. Remember that this data is specific to your tenant and so it is incredily useful for making organisation wide announcements should there be any lengthy downtime. How much time could you save for your front line IT helpdesk if end users could check the status of a service using a Virtual Agent or IT SharePoint Communication Site?
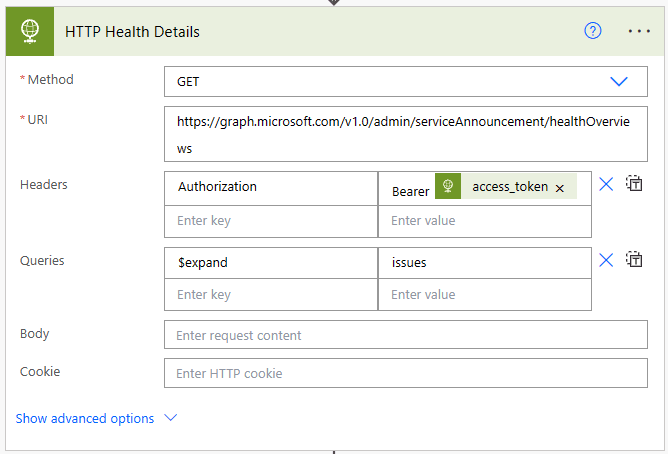
I also experimented with Queries to include an $expand on issues. This enabled me to retrieve far more detailed information about each platform. As well as the current status, it was possible to retrieve the most recent update on a Platform degredation, details of which were in a nested array.
Example of using $expand on issues
By combing this data with a sort() and reverse() expression it is possible to sort the updated data by date descending and save the most recent update. Again this could be potentially useful information for end users or front line IT. Below you can see an example of the potential data that can be captured.
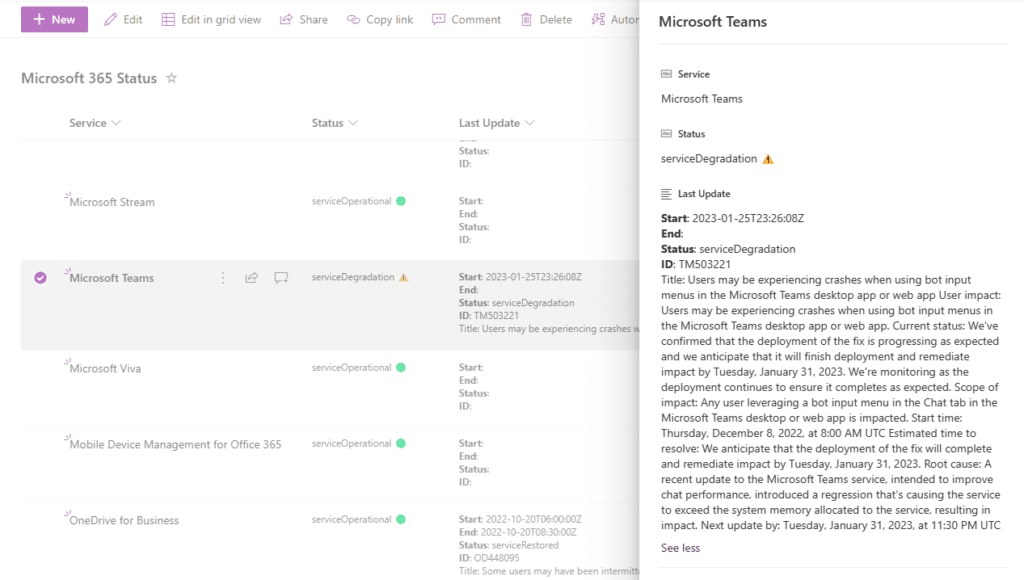
Sample data about Platform Service Health
Hope you enjoyed this, please let me know how your org has used this to solve a problem and don’t forget to check out my YouTube 👍